Saturday, December 27, 2014

Christmas Cream Cheese Coffee Cake

Grandmom decided to go with a cinnamon coffee cake this year. No doubt delicious, but not Christmas for me the way her cream cheese coffee cake is. I took down mom and dad's recipes cards and sorted through until I found the directions, then set to work. Christmas was coming after all.


Notes:
  1. I missed that on the top line it says that it makes two. Whoops. Thankfully, Sarah found that.
  2. Grandmom rolls out the dough, but patting it out in the foil worked fine. Plus, it saves you on dishes.
  3. Bake uncovered. I baked it covered for the 25 minutes, but it didn't brown at all. It turned out fine baking another 10 minutes unwrapped and cranking the temp up to 375 for the last couple of minutes, but it will save you a bit if you bake it uncovered from the beginning. (Most importantly, it means that you'll be disturbed from your Christmas eve nap less frequently.)


Tuesday, December 23, 2014

The next generation of holiday foods

"Nana, what's this?"

The funny looking tool must have hung on the wall next to the stove since before I was born. But I don't think I noticed it until I was in college.

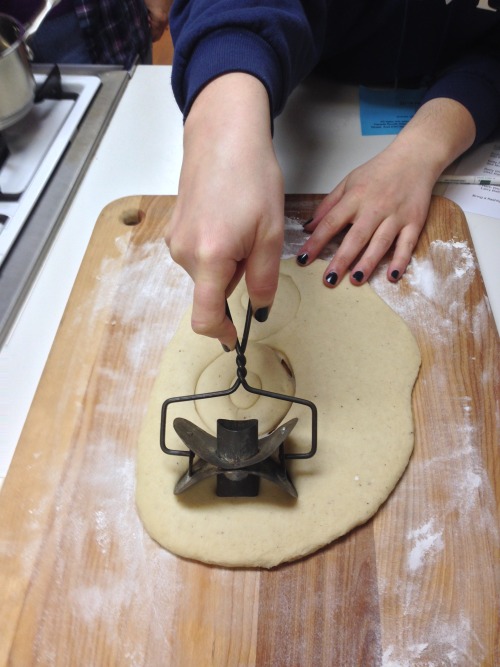
Can we agree that it's funny looking?
It's a dougnut cutter.

It is genius. I'm not sure how the fancy cooking gadgetry shops aren't selling these en masse throughout the holiday season. (I found one British site that has something, but it's missing the hole.)

1) It's a super-fun tool.
2) But it is mostly single use.
3) That would pair well with specialty sugars and glaze mixes and decorating supplies and whatever the hot doughnut cookbook is that season. (Actually, edit, is there a hot doughnut cookbook? Liz, we could propose a cookbook! That sounds like a great post-graduation career plan, right? ... Scopes out the competition. Top Pot published something three years ago. Maybe I'll stick with Plan A after all.)

Anyway.

The photos aren't date-stamped, but we think we made doughnuts with Nana the last Christmas in the house.

Elizabeth and I agreed then that we'd probably argue over who got the doughnut cutter when we divided the kitchen. Especially since I haven't had much success finding a similar cutter. Even in the internet age. Refer to my tangent.

This fall we sat on the apartment floor sorting. You take the cookie sheets. I get the silverware. Do either of us have space for the stand mixer? These baby pie plates are so cute!

We stared at each other when this came up. And then mom swooped in and claimed it.

Which obviously means that this was the Christmas for making doughnuts at mom's house. We pulled out the community cookbook, decided that 4.5 cups of flour was probably more than we needed and scaled down.


Doughnuts (makes not quite a dozen)
1/2 cup milk
4 teaspoons shortening
1/4 teaspoon salt
1 packet yeast
1 egg
1/4 cup sugar
dash nutmeg
1.5 - 2.5 cups flour, divided
Lots of oil for frying
Powdered sugar + spices for dusting

Scald the milk. Add the shortening and salt.
When it's cool enough, add the yeast and a cup of flour. Mix well. Then let the dough proof for 15 minutes "until full of bubbles."
Meanwhile mix the egg, sugar, and nutmeg. When the dough is ready, add the egg mixture and another half cup flour. Add flour by the half cup until it's kneadable. Then knead.
Let the dough rise for about an hour.
Turn out on a lightly floured board and roll. The recipe says 3/4 inch thick, but since we were making a third of the recipe we were closer to 1/4 inch thick.
(No, that wasn't the actual logic. Yes, that was the actual measurements.)
Cover with cloth and let rise "until top is springy to touch of finger."
Heat oil to 350-375ºF. (Our stove was finicky, so we kept turning the heat on and off to maintain the right temperature when we were frying. The candy thermometer was critical for this.)
Drop a doughnut into the hot fat with the raised side down. This lets the top side rise while the other side cooks. Fry for about a minute. Flip. Fry other side for a minute. Transfer to a paper towel to drain.
To dust with powdered sugar, put the sugar in a small paper bag. Put in 3 doughnuts at a time to shake, shake, shake.


~~~
Other cooking this holiday season:

Cheese straws and lady fingers a la Grandma Gerri

Chocolate Orange Peels. This year mostly following this post. Hot tip was to blanch the peels when they're in large sections and then cut into small strips before the candying process. Other experiment, when I ran out of chocolate chips, I tossed the rest in cocoa powder (this year was super sticky). Chocolate is better.

And I didn't cook them, but did get the recipe for Grandmom's Sausage Balls.


Saturday, June 7, 2014

Farm to City

Summer is upon us, and with it, CSA season. This morning was the first pickup of my CSA, including lots of greens (red lettuce, kale, and spinach!) and the first crop of strawberries. I'm supporting the same farm as last year, so I'm looking forward to peppers, carrots, and apples upon apples as the season progresses.

As my CSA starts back up, it's time to reflect upon an experiment that I tried this spring, Quinciple. Quinciple is a weekly grocery delivery service in NYC that delivers to my office. I've heard a couple of people refer to Quinciple as a CSA. Quinciple does partner with farms, but you aren't investing in a farm up front as they plan for their season and begin planting. Thus, I think that grocery delivery is a better category. They do strive to include as much produce from the northeast as possible, but it's nice to have lemons from California and the occasional Wisconsin gouda thrown in. Although a box is geared for two people, I found that the ingredients typically lasted long enough or were freezable/pantry items that it was no trouble for me to stretch it to two weeks for just myself (or with a dinner with a friend thrown in).

One of my favorite parts of my CSA is that it encourages me to experiment. It's unlikely that I'd buy kohlrabi or celeriac on my own, but when it's thrown into my box, I'll find a way to use it. Similarly, Quinciple encouraged me to branch out. As a general rule, I don't buy meat. I'm not a vegetarian, but I save meat for going out to eat or office lunches. Yet, except for the occasional for vegetarian week featuring dried beans, Quinciple includes some sort of meat. Pork chops, chicken thighs, and smoked salmon have all been adventures for me, but also fun as I become comfortable cooking new foods. Plus, I still have brats in my freezer, which will make for delicious grilling later this summer.

Below is one of my favorite meat experiments using one of Quinciple's recommended recipes for Memorial Day weekend. The meatballs were delicious enough, that I'd actually consider buying ground beef expressly for making them again.

Cumin Spiced Meatballs with Rhubarb Compote

For the meatballs:
  • 1/2 lb ground beef
  • 1 slice bread
  • 1/2 bunch ramps, green tops only
  • 1 egg
  • 1 Tbsp olive oil
  • 1 1/2 tsp ground cumin
  • 1 tsp chopped rosemary (I skipped, but you'd probably enjoy it.)
  • salt and pepper
Preheat your oven to 400 degrees. In a large bowl, mix the cumin with the beef and 1/2 tsp of salt. Toast the bread thoroughly and make into breadcrumbs (hint: food processors are wonderful). Add the breadcrumbs to the the meatballs along with the egg and the rosemary. Finely chop the green tops of the ramps finely and add them as well. (Note: ramps are a variety of wild leeks that grow in the Northeast. If you don't have them, I'd try scallions.) Mix every thoroughly.

Grease a cookie sheet with olive oil. Form the beef into small meatballs, about 1 1/2 inches in diameter. Arrange evenly on the cookie sheet and pop in the oven. They'll need about 15 to 20 minutes to cook. Use this time to make the rhubarb compote.

Once the meatballs are cooked through, serve with a generous dollop of rhubarb compote. (May be served over rice if you wish.)


For the rhubarb compote:
  • 3 cups chopped rhubarb
  • 1/4 cup sugar
  • 1/2 lemon
  • 2 Tbsp water
Put the rhubarb, sugar, and water into a medium, heavy bottomed saucepan. Squeeze in the lemon, and add the rind in too. Cook over medium heat, stirring occasionally, until the rhubarb is tender but not mushy. Remove the lemon rind. Any extras can be refrigerated and be enjoyed on toast or over vanilla ice cream.

Wednesday, January 1, 2014

Finnish-ing the Year

After arriving home at 5pm New Year's Eve, I didn't feel like heading out into the cold. Curling up on the couch with my roommate, cats, and her friends to ring in 2014 with Duck Soup and Junior's cheesecake seemed just right. And since I wasn't braving the crowds, I decided that I had enough time to mix, knead and braid a Finnish Pulla.

Finnish Pulla is a delightful yeasted bread for winter. It is packed with cardamom, which tastes great on its own or paired with soup. The dough is similar to challah and is traditionally braided in a ring, so half the fun of the bread is presentation. Thus, perfect for showing off for company!


Finnish Pulla (Cardamom bread) a la Baking with Julia

Ingredients:
1 cup milk
1 Tbsp active dry yeast
1/4 cup warm water (about 110 F)
1/2 cup sugar
1 tsp crushed cardamom seeds (about 7 pods worth)
1 tsp salt
2 large eggs, lightly beaten, at room temperature
4.5 to 5 cups unbleached all-purpose flour
1 stick (4 oz) unsalted butter, melted

1 large egg beaten with 1 Tbsp milk, for glaze
Sliced or slivered almonds, for topping

Put the milk in a small saucepan and scald it (heat it until a ring of small bubbles is visible around the sides of the pan). Remove the pan from the heat and cool the milk to a temperature of
between 105 and 115 F.

In a large bowl, whisk the yeast into the warm water. Set aside for 5 minutes, or until the yeast has
dissolved and is creamy. Whisk in the milk, sugar, cardamom, salt, and eggs. Switch to a wooden spoon, add 2 cups of the flour, and beat the mixture until smooth. Beat in the butter and then add as much additional flour, half cup at a time, as you can until the dough is stiff but not dry. Cover the bowl with plastic wrap and allow the dough to rest for 15 minutes.

Turn the dough out onto a lightly floured work surface and knead until it is smooth and satiny, about 10 minutes.

First Rise: Shape the dough into a ball. Place it in a lightly greased bowl, turn it around in the bowl to
grease the top, and cover the bowl tightly with plastic wrap. Let the dough rise at room temperature until
it doubles in bulk, 45 minutes to 1 hour.

Line a large baking sheet with parchment paper and set aside. Lightly oil a cool work surface for shaping the dough. Turn the dough out onto the oiled surface and knead it lightly and briefly, just to deflate it and release the air. Divide the dough into thirds and roll each third into a rope about 36 inches long. Braid the three strands, braiding as far down to the bottom of the strands as you can. Lift the long braid onto the parchment-lined pan, shaping it into a circle as you place it on the pan. Snip about 1 inch of dough off each end of the braid and fuse the ends together, pressing and pinching them together
.
Second Rise: Cover the wreath with a kitchen towel and allow it to rise at room temperature until it
is puff y but not doubled, about 45 minutes. Meanwhile, center a rack in the oven and preheat the oven to
375 F.

Brush the egg glaze over the bread. Sprinkle the wreath with sliced almonds or pearl sugar for an extra treat. Bake for 20 to 25 minutes, until golden, taking care not to overbake the wreath. Transfer the loaf to a rack to cool to room temperature before cutting.