Showing posts with label family stories. Show all posts

Thursday, September 20, 2018

Butter mints magic


The holy grail of butter mints

Betty McEachin's butter mints were legendary growing up. Our grandmother savored them and only spare us a taste. They were cool and buttery and melt-your-mouth magical.

For as long as I remember, we were told that the recipe was a family secret. I made butter mints growing up using a recipe from American Girl magazine. I'd dye the dough and sculpt snowmen, Santas, and the North Polar Bear. My creations may have measured up in creativity and design, but they didn't compare to Betty McEachin's in taste. When Mom suggested I make mints for the wedding preception, Grandmom said that she thought she could get Betty McEachin's recipe, and procure it, she did. She passed it along saying, "The real trick, as I'm sure Betsy knows, is a cold marble slab."

The American Girl recipe that got me started. It's a completely different technique than pulled butter mints.

I had no idea that a marble slab was required or even suggested and didn't own one. Marble slab made me think of the ice cream chain, not mints. Buying one ended up being the longest step in the process. We waited for the family store to get them in, but they kept being delayed. I considered calling up a contractor to see if they had any odd-sized pieces. In the end, I went the easy route and ordered online.

Leading up to the preception, I finally got my marble slab and made a practice run. They stuck all over my hands! I quickly discovered that the directions weren't joking when it said to butter your hands. I was apprehensive that I'd somehow pull them too much, so they ended up softening and not holding their shape after I cut them. Delicious nevertheless. Traveling with the mints didn't make much sense, so I planned to make some once I was in state for the preception.

A couple of evenings before the preception, I boiled up more butter, sugar, and water and began pulling and pulling the mints. Like before, the mixture stuck all over my hands. I wanted the mints to hold their shape this time, so I pulled and pulled. The mixture kept sticking everywhere, and then, suddenly it turned to sandy crumbs.

Huh? I was startled. Had I pulled it too hard? Was it something I said? I stuck the sugar crumbs back into the pot and added more water and boiled it back to a syrup again. This time, I didn't pull quite as long and began snipping off pieces before it turned too sandy. Once again, the mints didn't hold their shape, but they did soften and melted in our mouths. After a bit of research, I discovered that the problem was likely the humidity. It had poured that afternoon, and rainy days are suboptimal for candy making.

Last weekend, we had a master class with Betty McEachin. We learned not to stir the pot as the contents boil and that peppermint oil is the way to go. And we pulled and we pulled and we pulled.

Pouring the boiling syrup onto the marble slab.

Ingredients
3 cups white sugar
1 1/2 cups water
3 Tbsp margarine*
3 Tbsp butter
1/2 tsp oil of peppermint*
* Betty said that it's probably fine to do 100% butter instead of 50/50 butter/margarine, but to use oil of peppermint rather than extract. She often finds oil of peppermint at drug stores.

  1. Combine all of the ingredients except the oil of peppermint in a pot on the stove. Bring to a boil, and let it boil without stirring until mixture reaches 260-265 degrees F. This is hard ball stage. You can confirm the consistency by putting a bit on a spoon and then sticking it into a bowl of water.
  2. While waiting for the mixture to reach temperature, liberally butter your marble slab. If it's a hot day, you should have already cooled down your marble slab by places ice cubes on it to chill the marble and then wiping it dry. If it's winter and cold out, no need to chill your marble beforehand.
  3. When the mixture reaches 260-265, turn off the heat and pour the syrup over the marble, being sure to spread it over the surface.
  4. Dab the peppermint across the surface of the syrup.
  5. Butter your hands. Stretch the edges out to increase the surface area and allow the mixture to cool faster. As the edges cool, fold them back over the mixture and pull out areas that haven't yet cooled.
  6. Once it has cooled enough to handle, start pulling. A single twist per each pull in order to create the ridges. See video for what it looks like.
  7. Keep pulling until it begins to get hard. Then, lay your cord out on wax paper and begin cutting with kitchen shears. The cord should be ~1 inch thick and you should aim to cut the mint pieces ~1/4 inch thick. (I had always imagined that it was the reverse.) Do not let the cut mints touch on the wax paper once they're cut. Otherwise, they'll stick together.
  8. Pack in airtight container with wax paper between the layers. Again, spread the mints out so that they don't touch.
  9. It will take a day or so for the mints to cream, though no one will blame you if you go ahead and try one or three while they're still in their taffy state. ;)

Tips
  • Too hard means that the mints were overcooked. Sandy means that the mints were under cooked.
  • Do not stir the boiling mixture. Don't do it. I know you'll want to fuss over it.
  • You can stir in food coloring right before pouring onto the marble if you like.
  • Keep mints at room temperature. Can freeze in an airtight container. Let warm up to room temperature before giving away.
  • You can't compete with the master who has been making these for decades. Her touch will always be the epitome of butter mints.
Packing the cut mints away, and maybe snitching a couple tastes, too.

Tuesday, December 23, 2014

The next generation of holiday foods

"Nana, what's this?"

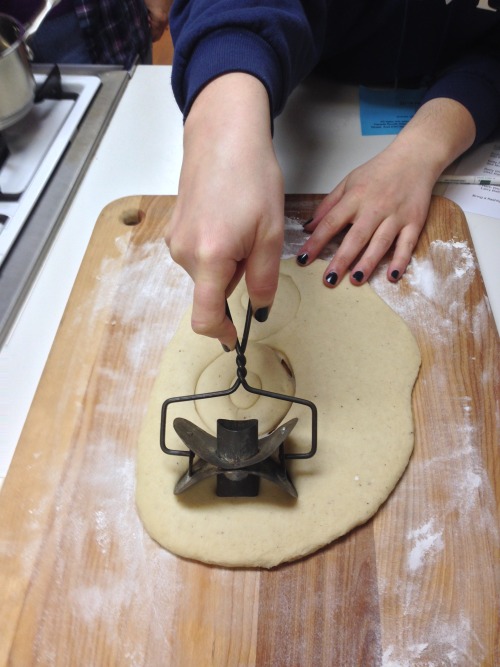
The funny looking tool must have hung on the wall next to the stove since before I was born. But I don't think I noticed it until I was in college.

Can we agree that it's funny looking?
It's a dougnut cutter.

It is genius. I'm not sure how the fancy cooking gadgetry shops aren't selling these en masse throughout the holiday season. (I found one British site that has something, but it's missing the hole.)

1) It's a super-fun tool.
2) But it is mostly single use.
3) That would pair well with specialty sugars and glaze mixes and decorating supplies and whatever the hot doughnut cookbook is that season. (Actually, edit, is there a hot doughnut cookbook? Liz, we could propose a cookbook! That sounds like a great post-graduation career plan, right? ... Scopes out the competition. Top Pot published something three years ago. Maybe I'll stick with Plan A after all.)

Anyway.

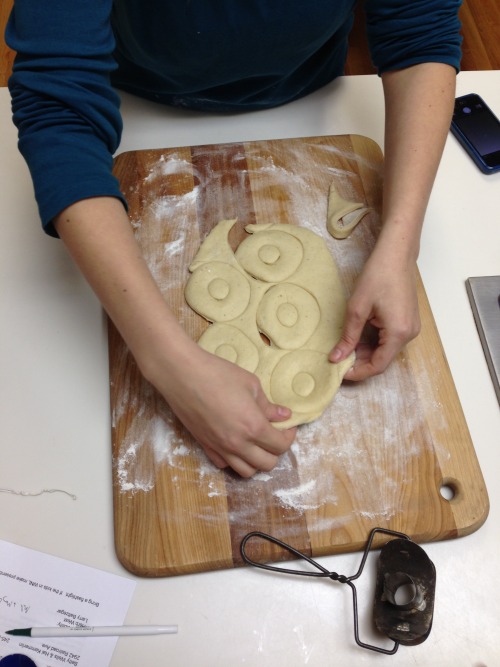
The photos aren't date-stamped, but we think we made doughnuts with Nana the last Christmas in the house.

Elizabeth and I agreed then that we'd probably argue over who got the doughnut cutter when we divided the kitchen. Especially since I haven't had much success finding a similar cutter. Even in the internet age. Refer to my tangent.

This fall we sat on the apartment floor sorting. You take the cookie sheets. I get the silverware. Do either of us have space for the stand mixer? These baby pie plates are so cute!

We stared at each other when this came up. And then mom swooped in and claimed it.

Which obviously means that this was the Christmas for making doughnuts at mom's house. We pulled out the community cookbook, decided that 4.5 cups of flour was probably more than we needed and scaled down.


Doughnuts (makes not quite a dozen)
1/2 cup milk
4 teaspoons shortening
1/4 teaspoon salt
1 packet yeast
1 egg
1/4 cup sugar
dash nutmeg
1.5 - 2.5 cups flour, divided
Lots of oil for frying
Powdered sugar + spices for dusting

Scald the milk. Add the shortening and salt.
When it's cool enough, add the yeast and a cup of flour. Mix well. Then let the dough proof for 15 minutes "until full of bubbles."
Meanwhile mix the egg, sugar, and nutmeg. When the dough is ready, add the egg mixture and another half cup flour. Add flour by the half cup until it's kneadable. Then knead.
Let the dough rise for about an hour.
Turn out on a lightly floured board and roll. The recipe says 3/4 inch thick, but since we were making a third of the recipe we were closer to 1/4 inch thick.
(No, that wasn't the actual logic. Yes, that was the actual measurements.)
Cover with cloth and let rise "until top is springy to touch of finger."
Heat oil to 350-375ºF. (Our stove was finicky, so we kept turning the heat on and off to maintain the right temperature when we were frying. The candy thermometer was critical for this.)
Drop a doughnut into the hot fat with the raised side down. This lets the top side rise while the other side cooks. Fry for about a minute. Flip. Fry other side for a minute. Transfer to a paper towel to drain.
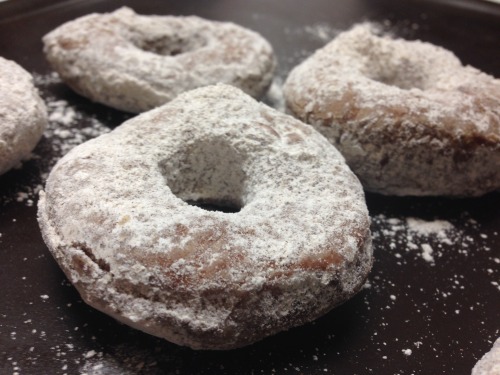
To dust with powdered sugar, put the sugar in a small paper bag. Put in 3 doughnuts at a time to shake, shake, shake.


~~~
Other cooking this holiday season:

Cheese straws and lady fingers a la Grandma Gerri

Chocolate Orange Peels. This year mostly following this post. Hot tip was to blanch the peels when they're in large sections and then cut into small strips before the candying process. Other experiment, when I ran out of chocolate chips, I tossed the rest in cocoa powder (this year was super sticky). Chocolate is better.

And I didn't cook them, but did get the recipe for Grandmom's Sausage Balls.


Friday, March 30, 2012

How do you use a ton of cabbage?

A month ago, Aunt Ruth and Aunt Ellie shared how when they were growing up on the farm they used to sell cabbage by the ton. I can't even fathom a ton of cabbage or dream of things to make with it. Yet they would sell a ton of cabbage for some ridiculously low price, like $8.

Spurred by that conversation, when St. Patrick's day rolled around and cabbage was on sale, I had to buy some. A head of cabbage might not weigh a ton, but it still takes some work to eat through three or four pounds of cabbage. Here's how I used mine:

Crunchy Vietnamese Cabbage Salad with Pan-Seared Tofu
This New York Times recipe is quite delicious. Soy sauce, lime, garlic, jalapeno. Mmmmmmmmmm. Seriously, go buy a cabbage and make it.

Okonomiyaki
Okonomiyaki is a Japanese cabbage pancake dish introduced to me by my friend Michelle. The following recipe is adapted from The Tassajara Bread Book and isn't all that true to the normal ingredients, but I've found it to work out fine. If you're interested in a more authentic version, you can often buy okonomiyaki mixes and sauces at specialty Asian groceries.

Ingredients (for about two servings worth)
1/4 cabbage
1 carrot
½ onion:  yellow or purple
(1/2 c meat or fish pieces or tofu, if desired, or whatever you have around)
1 c (or more) flour:  whole wheat and unbleached white
1 egg, beaten
1 T brown sugar
1/2 t salt
1/2 cup milk
Enough water to make batter

Chop, shred, dice or thinly slice vegetables and meat. Mix together remaining ingredients to from batter.  Fold vegetables into batter, pour into a frying pan, and cook on medium heat until thoroughly cooked. Serve either warm or cold with soy sauce and spicy mayo (I mix sriracha into regular mayo).

Caramelized Onions and Cabbage Pasta
Easy to make with few ingredients, but it does take some time to caramelize the onions. I'd argue that caramelized onions are always worth it though.

1 Tbsp butter
1/2 onion, sliced
1 cup shredded cabbage
pasta
a taste of Balsamic vinegar
pepper

Melt the butter on medium-low. Add the onions and saute until translucent and almost starting to brown. Then, add the cabbage and continue to saute.

Once you've added the cabbage, put on water to boil the pasta. The cabbage and onions should caramelize about the time the pasta finishes cooking. Season with Balsamic vinegar and fresh ground pepper.